K8s Device Plugin 연동부터 Custom CRD(NpuDeploy) 개발, Istio 네트워크 구성, 그리고 vLLM을 활용한 고성능 추론 서비스 구축까지의 엔지니어링 경험을 공유합니다.
들어가며
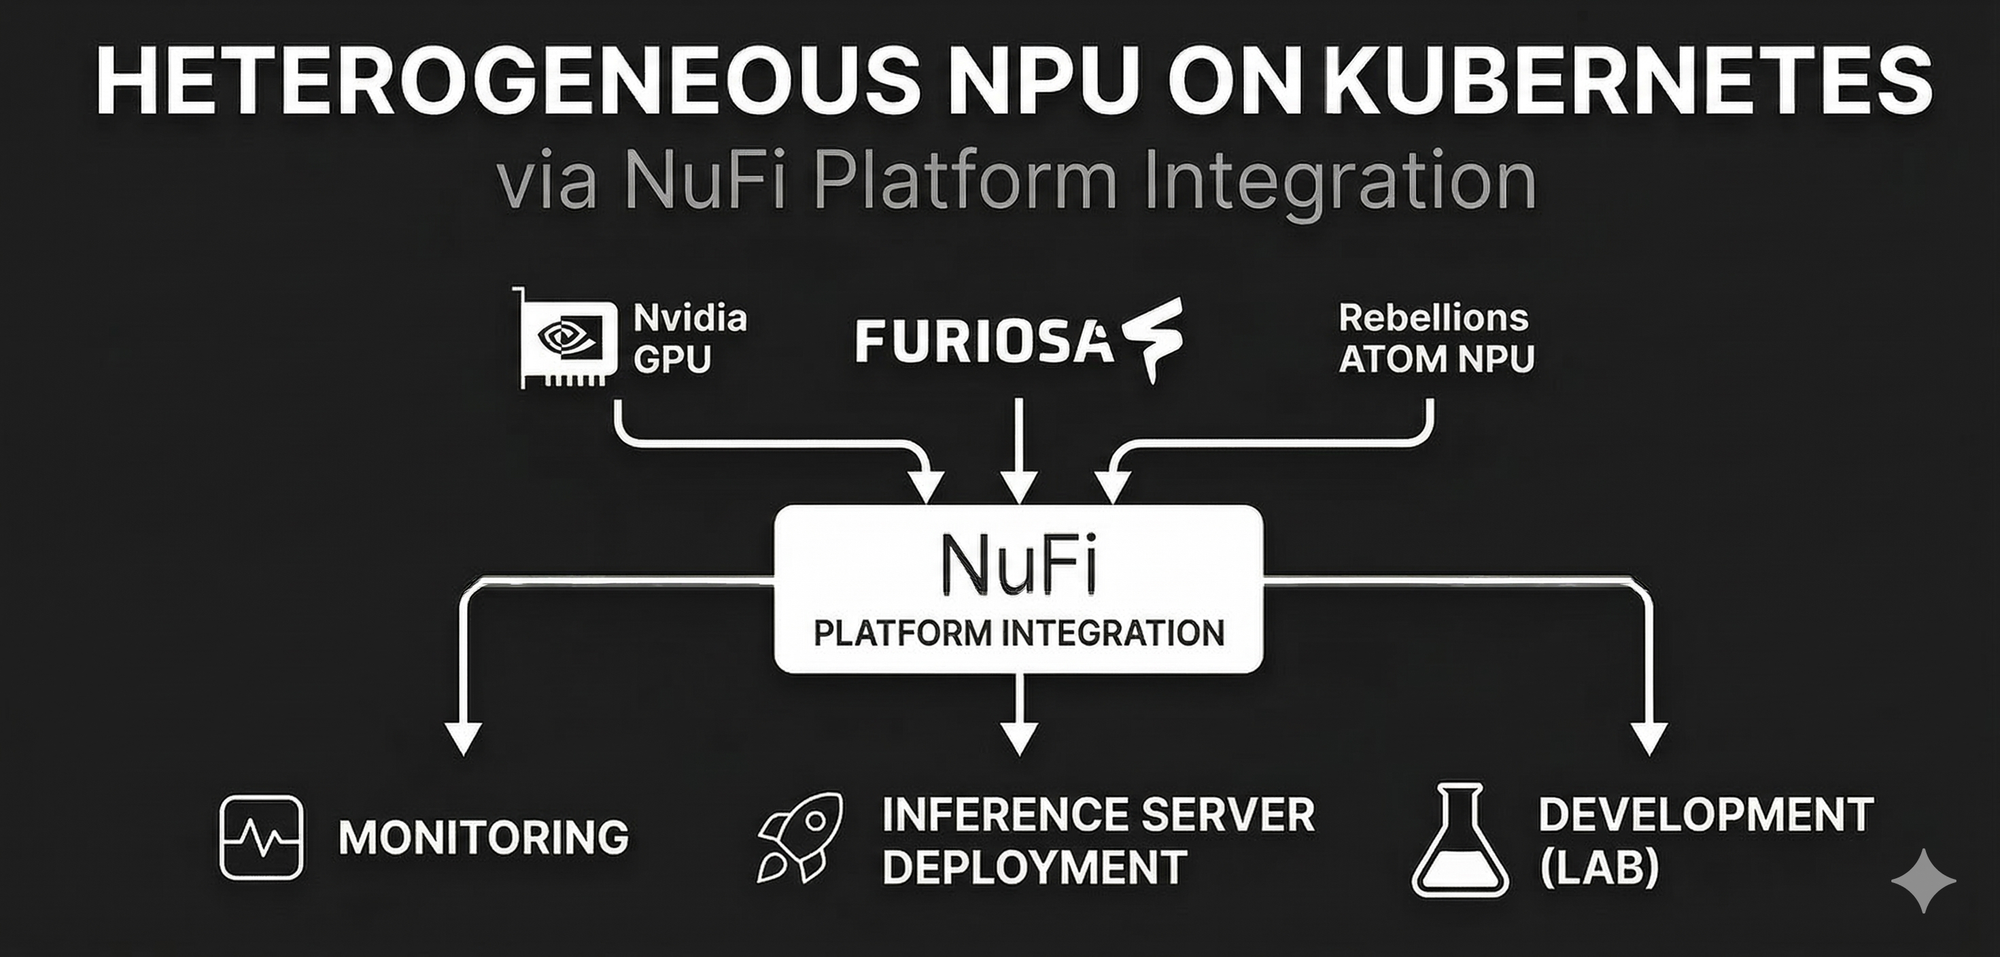
LLM 서비스를 운영하다 보면 단순히 모델을 배포하는 것을 넘어, 다수의 사용자가 다양한 AI 가속기(GPU, NPU)를 효율적으로 공유하고, 추론 서비스를 쉽게 배포/관리할 수 있는 플랫폼이 필요해집니다.
본 글에서는 NuFi(NPU Inference) 플랫폼을 구축하면서 얻은 경험을 공유합니다. Kubernetes Device Plugin으로 NPU를 클러스터 리소스로 등록하고, Kubeflow/KServe를 벤치마킹하여 필요한 기능만 담은 자체 CRD를 설계했으며, Istio와 vLLM을 결합하여 유연한 서빙 환경을 구현한 과정을 다룹니다.
Demo: NuFi 플랫폼 데모 영상 보기
1. 시스템 아키텍처
전체 플랫폼은 다음과 같은 구조로 설계했습니다:
1.1 주요 컴포넌트
| 컴포넌트 | 역할 | 기술 스택 |
|---|---|---|
| NuFi Controller | NpuDeploy CRD Reconcile, 리소스 자동 생성 | Kubebuilder (Go) |
| NuFi API Server | REST API, 인증/인가, 프로젝트 관리 | Gin (Go) |
| Dashboard | 웹 UI, 배포 관리, 모니터링 | Next.js |
| Device Plugin | NPU를 Kubernetes 리소스로 등록 | Go |
| Monitoring | 메트릭 수집 및 시각화 | Prometheus, Grafana |
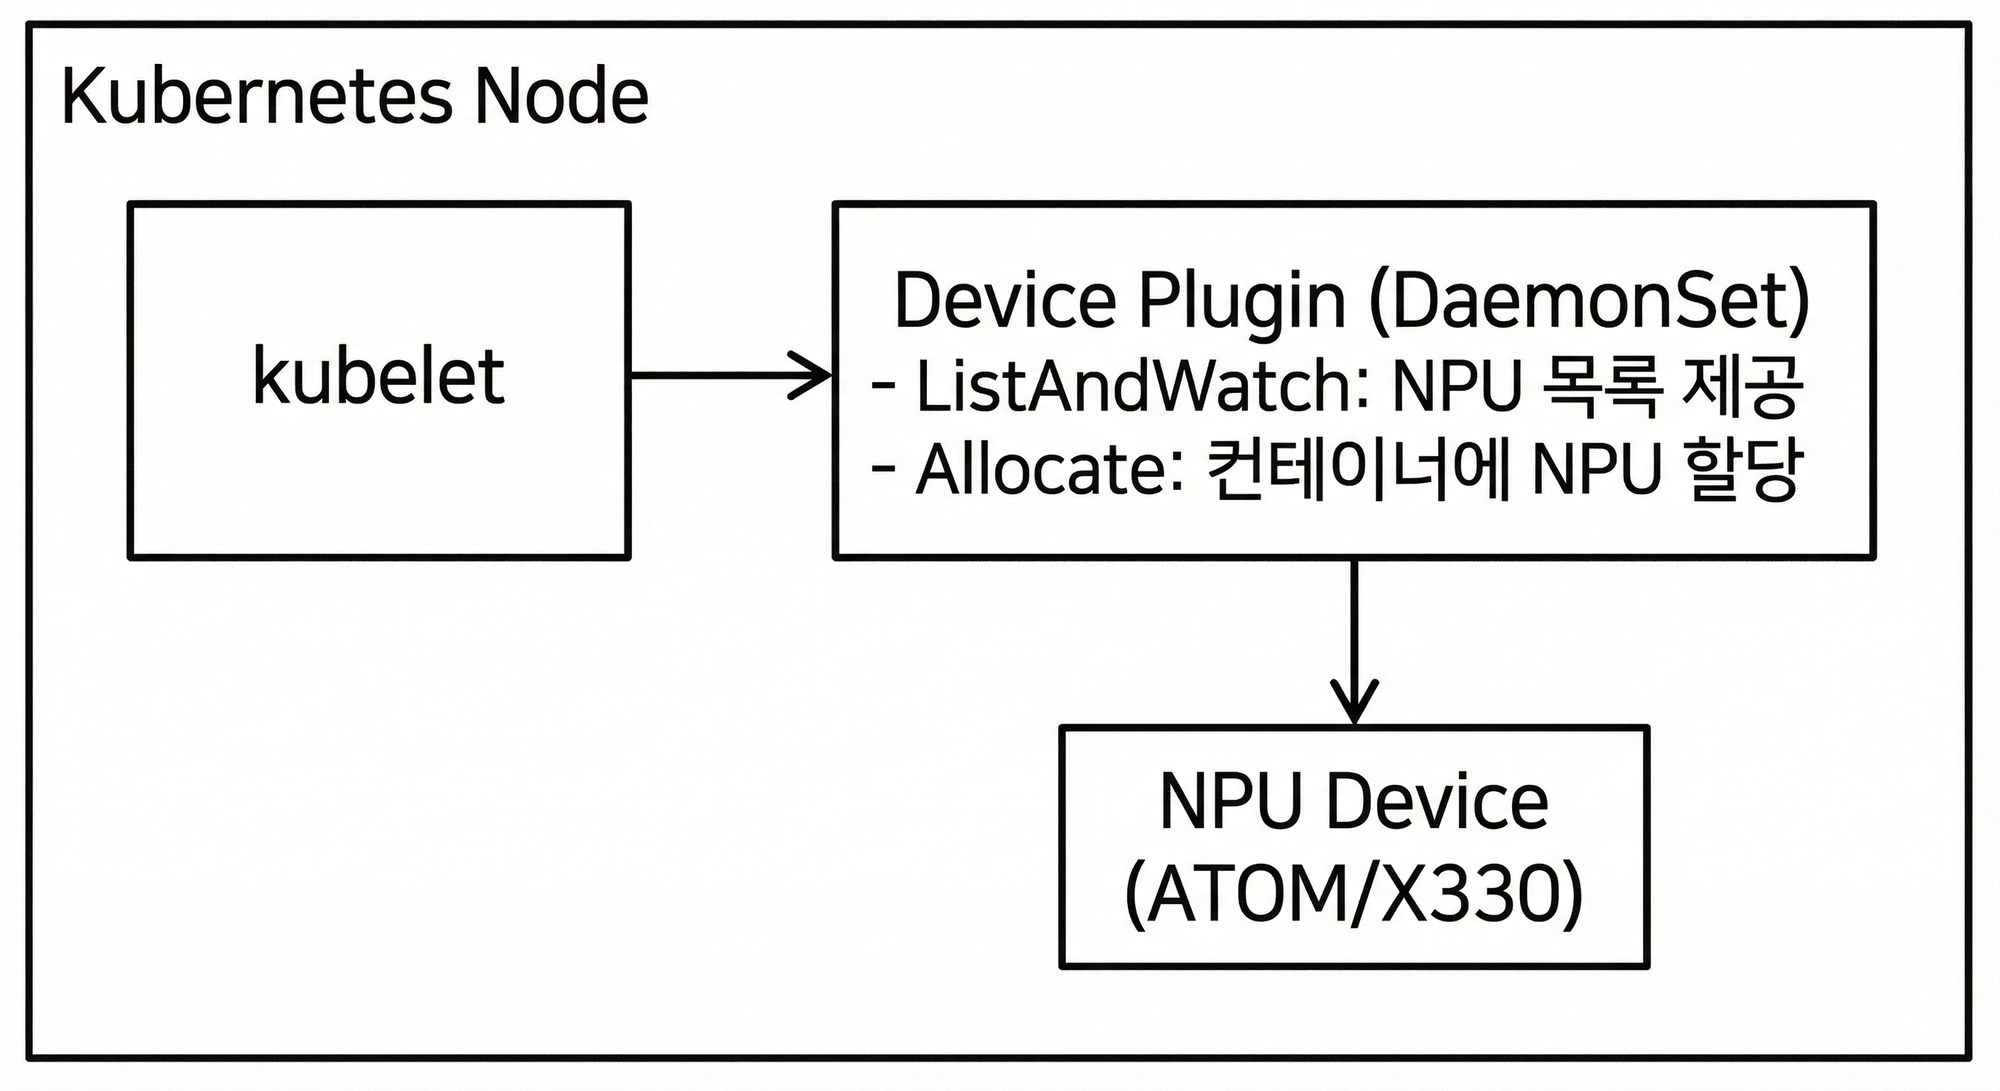
2. Kubernetes Device Plugin
2.1 NPU를 Kubernetes 리소스로 등록
Kubernetes에서 CPU, Memory, Storage 등의 기본 리소스는 관리가 가능하지만, GPU나 NPU 같은 Custom Device는 Device Plugin을 통해 등록해야 합니다.
Device Plugin의 역할
-
ListAndWatch: 노드에 장착된 NPU 장치를 탐색하고 상태를 Kubelet에 보고합니다.
-
Allocate: 파드 생성 요청이 오면 실제 물리 장치 ID를 컨테이너 환경변수 등으로 주입하여 할당합니다.
리소스 프로비저닝 기능
Device Plugin을 통해 다음과 같은 리소스 관리가 가능해집니다:
- 가용 NPU 파악: 클러스터 내 NPU 개수 실시간 추적
- 자동 프로비저닝: 요청 시 남는 NPU가 있으면 할당, 없으면 Pending
- 우선순위 지원: 높은 우선순위 워크로드가 낮은 우선순위의 NPU 선점 가능
2.2 NPU 벤더별 Device Plugin
프로젝트 진행 중 NPU가 Sapeon X330에서 Rebellions ATOM으로 변경되면서, 두 가지 NPU 환경을 모두 경험했습니다.
| NPU | Device Plugin | 리소스 이름 | 비고 |
|---|---|---|---|
| Sapeon X330 | 자체 개발 | sapeon.com/snx3 |
초기 버전 |
| Rebellions ATOM | 공식 제공 | rebellions.ai/ATOM |
이후 변경 |
Rebellions의 경우 공식 문서에서 Device Plugin을 제공하므로, 별도 개발 없이 바로 사용할 수 있었습니다.
X330 Device Plugin DaemonSet YAML 보기
apiVersion: apps/v1
kind: DaemonSet
metadata:
  name: x330-device-plugin-daemonset
  namespace: sapeon-device-plugin
spec:
  selector:
    matchLabels:
      name: sapeon-device-plugin
  template:
    metadata:
      labels:
        name: sapeon-device-plugin
    spec:
      containers:
      - name: aix-device-plugin
        image: x330_k8s_device_plugin:v1.0
        imagePullPolicy: IfNotPresent
        env:
        - name: GRPC_GO_LOG_VERBOSITY_LEVEL
          value: "99"
        - name: GRPC_GO_LOG_SEVERITY_LEVEL
          value: info
        securityContext:
          allowPrivilegeEscalation: false
          capabilities:
            drop:
            - ALL
        volumeMounts:
        - name: device-plugin
          mountPath: /var/lib/kubelet/device-plugins
      tolerations:
      - key: CriticalAddonsOnly
        operator: Exists
      - key: app
        operator: Equal
        value: vps
        effect: NoSchedule
      volumes:
      - name: device-plugin
        hostPath:
          path: /var/lib/kubelet/device-plugins
정상적으로 등록되면 노드 상세 정보에서 NPU 리소스를 확인할 수 있습니다:
$ kubectl describe node npu-node-1
...
Allocatable:
  cpu:                64
  memory:             512Gi
  rebellions.ai/ATOM: 8    # RBLN NPU 리소스 등록됨
3. Custom Resource 설계: KServe 경량화
3.1 KServe 분석
표준적인 모델 서빙을 위해 KServe를 검토했습니다. KServe는 InferenceService라는 강력한 CRD를 제공하지만, 우리 프로젝트에는 다소 과도한 기능(Serverless, 복잡한 의존성 등)이 포함되어 있었습니다. 또한 VirtualService를 별도로 관리해야 하는 번거로움이 있었습니다.
KServe InferenceService YAML 예시 보기
apiVersion: serving.kserve.io/v1beta1
kind: InferenceService
metadata:
  name: kserve-llm
  namespace: ml-serving
spec:
  predictor:
    nodeSelector:
      kubernetes.io/hostname: gpu-node-1
    containers:
      - name: vllm
        image: vllm/vllm-openai:v0.5.4
        args:
          - --model
          - meta-llama/Meta-Llama-3.1-8B-Instruct
          - --tensor-parallel-size
          - "2"
          - --gpu-memory-utilization
          - "0.8"
        resources:
          limits:
            nvidia.com/gpu: 2

---
# VirtualService를 별도로 생성해야 함
apiVersion: networking.istio.io/v1
kind: VirtualService
metadata:
  name: kserve-llm-vs
spec:
  gateways:
    - kubeflow/kubeflow-gateway
  hosts:
    - kserve-llm.example.com
  http:
    - route:
        - destination:
            host: kserve-llm-predictor.ml-serving.svc.cluster.local
3.2 프로젝트에 필요한 기능 추출
우리는 KServe의 장점(선언적 배포)은 취하되, 복잡도는 낮춘 NpuDeploy CRD를 직접 설계했습니다.
KServe에서 참고한 기능:
- Custom Resource를 통한 선언적 배포
- Controller가 하위 리소스(Deployment, Service) 자동 생성
프로젝트에 맞게 단순화한 부분:
- VirtualService를 CRD 내부에 통합하여 단일 YAML로 완결
- Serverless/Autoscaling 등 불필요한 기능 제외
3.3 NuFi NpuDeploy CRD 설계

설계 목표
| 항목 | KServe | NuFi (NpuDeploy) |
|---|---|---|
| 리소스 관리 | InferenceService + VirtualService 별도 | NpuDeploy 하나로 통합 |
| 네트워크 | Gateway 직접 연동 필요 | endpoint 필드로 Ingress/VirtualService 자동 생성 |
| 목적 | 범용 ML 서빙 | NPU 추론 서버 특화 |
NpuDeploy YAML 예시 보기
apiVersion: dudaji.com/v1
kind: NpuDeploy
metadata:
  name: llama-8b
  namespace: ml-serving
spec:
  # 동적 엔드포인트 (VirtualService 자동 생성)
  endpoint:
    gateway: kubeflow/kubeflow-gateway
    host: llama-8b.nufi.me

  # 추론 서버 설정
  inferenceServer:
    image: vllm/vllm-openai:v0.5.4
    inferencePort: 8000
    replicas: 1
    args:
      - --model
      - meta-llama/Meta-Llama-3.1-8B-Instruct
      - --tensor-parallel-size
      - "2"
      - --gpu-memory-utilization
      - "0.8"
    resources:
      limits:
        nvidia.com/gpu: 2
    volumeMounts:
      - name: models
        mountPath: /models
      - name: dshm
        mountPath: /dev/shm
    volumes:
      - name: models
        hostPath:
          path: /mnt/data/model-cache
      - name: dshm
        emptyDir:
          medium: Memory
3.4 Operator Reconcile 로직
Go와 Kubebuilder로 구현된 컨트롤러는 NpuDeploy의 상태를 감지하여 다음 리소스들을 자동으로 생성하고 관리합니다.
NpuDeploy 생성
     │
     ├─▶ Deployment (추론 서버)
     │
     ├─▶ Service (내부 통신)
     │
     └─▶ VirtualService (외부 엔드포인트)  ← endpoint 필드가 있을 때
Reconcile 로직 코드 보기
func (r *NpuDeployReconciler) Reconcile(ctx context.Context, req ctrl.Request) (ctrl.Result, error) {
    logger := log.FromContext(ctx)

    nd := &dudajicomv1.NpuDeploy{}
    if err := r.Get(ctx, req.NamespacedName, nd); err != nil {
        if kerrors.IsNotFound(err) {
            logger.Info("NpuDeploy resource not found. Ignoring since object must be deleted")
            return ctrl.Result{}, nil
        }
        return ctrl.Result{}, err
    }

    // Status 업데이트를 위한 defer
    statusUpdater := NewStatusUpdater()
    originalStatus := nd.Status.DeepCopy()
    defer func() {
        if !reflect.DeepEqual(*originalStatus, nd.Status) {
            r.Status().Update(ctx, nd)
        }
    }()

    statusUpdater.SetReconciling(nd)

    // 모든 하위 리소스 Reconcile
    if err := r.reconcileAll(ctx, nd); err != nil {
        statusUpdater.SetError(nd, err)
        return ctrl.Result{}, err
    }

    statusUpdater.SetSuccess(nd)
    return ctrl.Result{}, nil
}

func (r *NpuDeployReconciler) reconcileAll(ctx context.Context, nd *dudajicomv1.NpuDeploy) error {
    // 1. Deployment 생성/업데이트
    if err := r.reconcileDeployment(ctx, nd); err != nil {
        r.Recorder.Event(nd, corev1.EventTypeWarning, "ReconcileError", err.Error())
        return fmt.Errorf("failed to reconcile Deployment: %w", err)
    }

    // 2. Service 생성/업데이트
    if err := r.reconcileService(ctx, nd); err != nil {
        r.Recorder.Event(nd, corev1.EventTypeWarning, "ReconcileError", err.Error())
        return fmt.Errorf("failed to reconcile Service: %w", err)
    }

    // 3. VirtualService (endpoint 필드 존재 시)
    if err := r.reconcileVirtualService(ctx, nd); err != nil {
        r.Recorder.Event(nd, corev1.EventTypeWarning, "ReconcileError", err.Error())
        return fmt.Errorf("failed to reconcile VirtualService: %w", err)
    }

    r.Recorder.Event(nd, corev1.EventTypeNormal, "ReconcileSuccess", "All sub-resources reconciled successfully")
    return nil
}
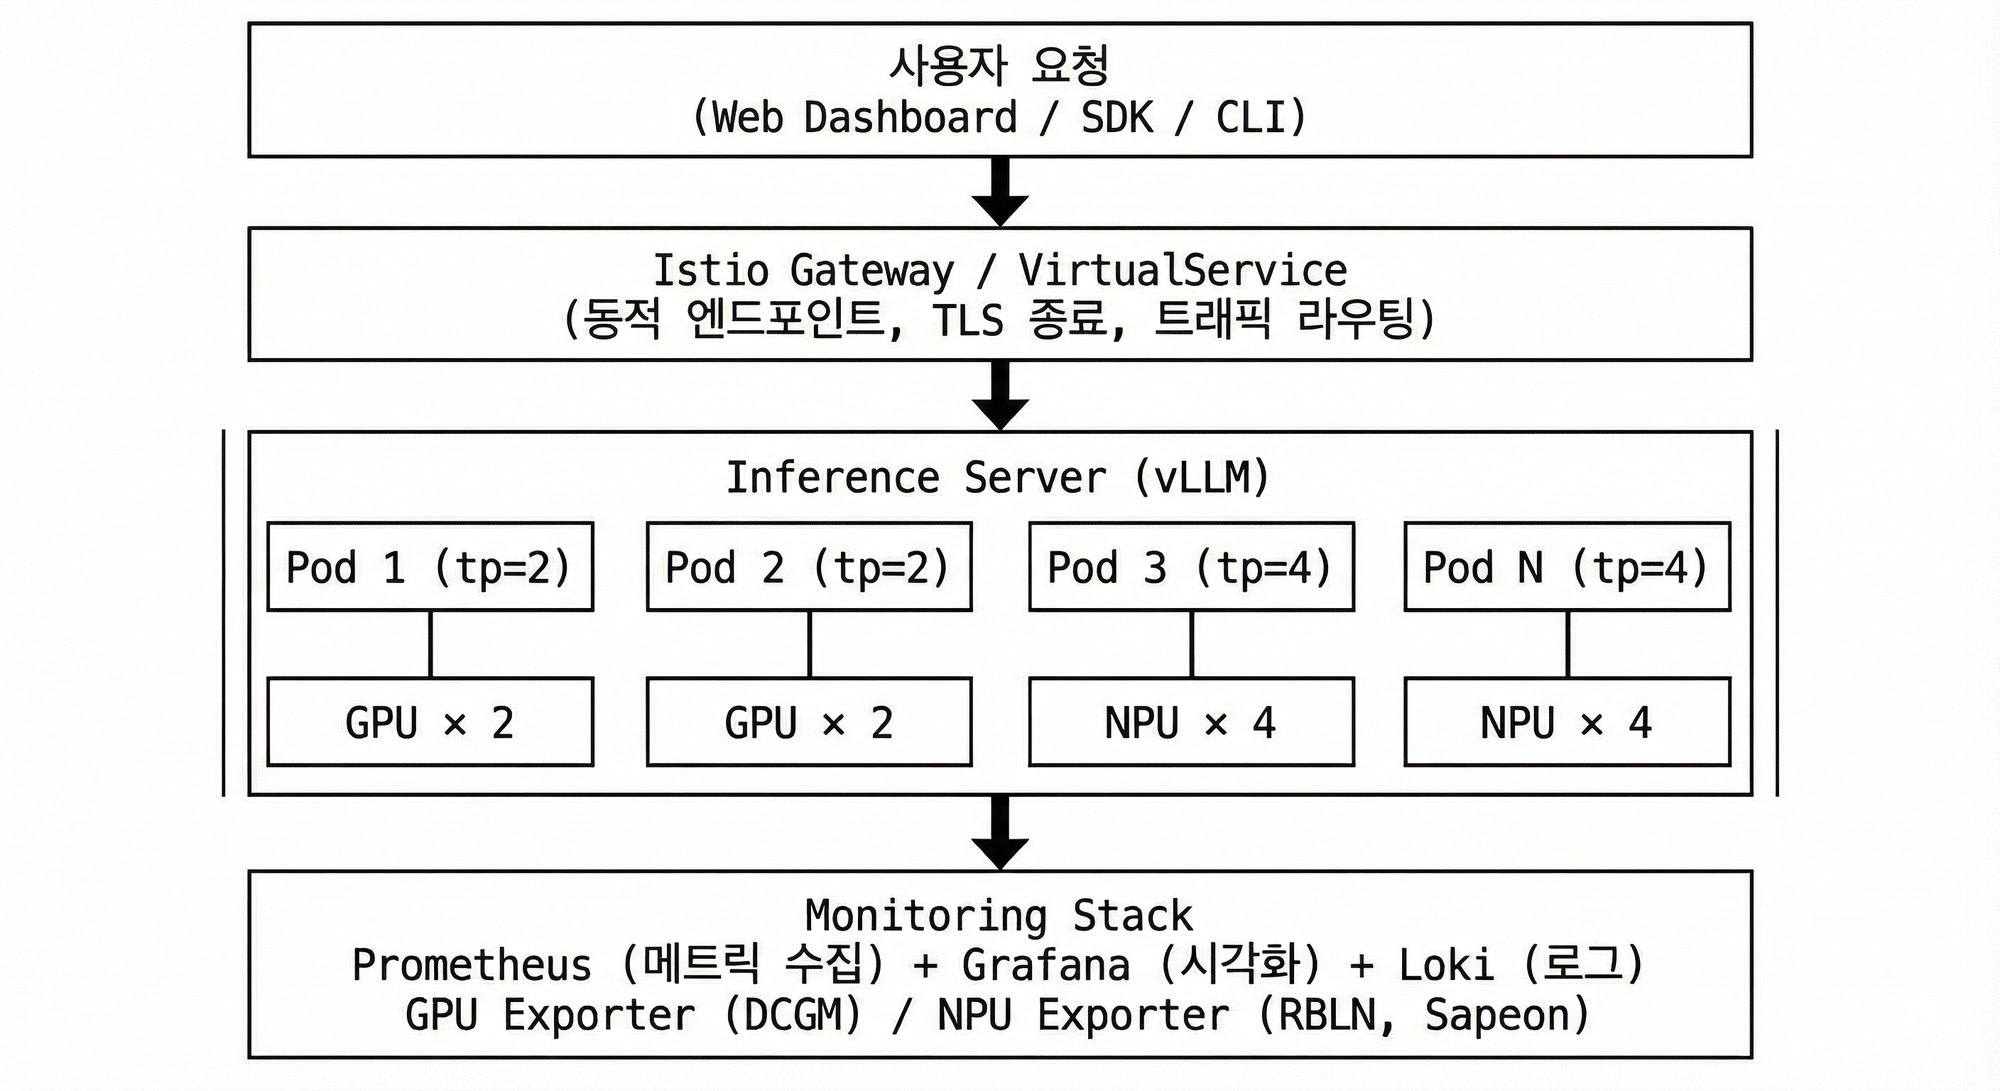
4. Istio 기반 동적 엔드포인트
4.1 왜 Istio인가?
여러 사용자가 각자의 추론 서비스를 배포할 때, 고유한 도메인을 자동으로 할당해주는 기능이 필요했습니다. Istio의 Gateway + VirtualService 조합으로 이를 구현했습니다.
Istio 트래픽 흐름
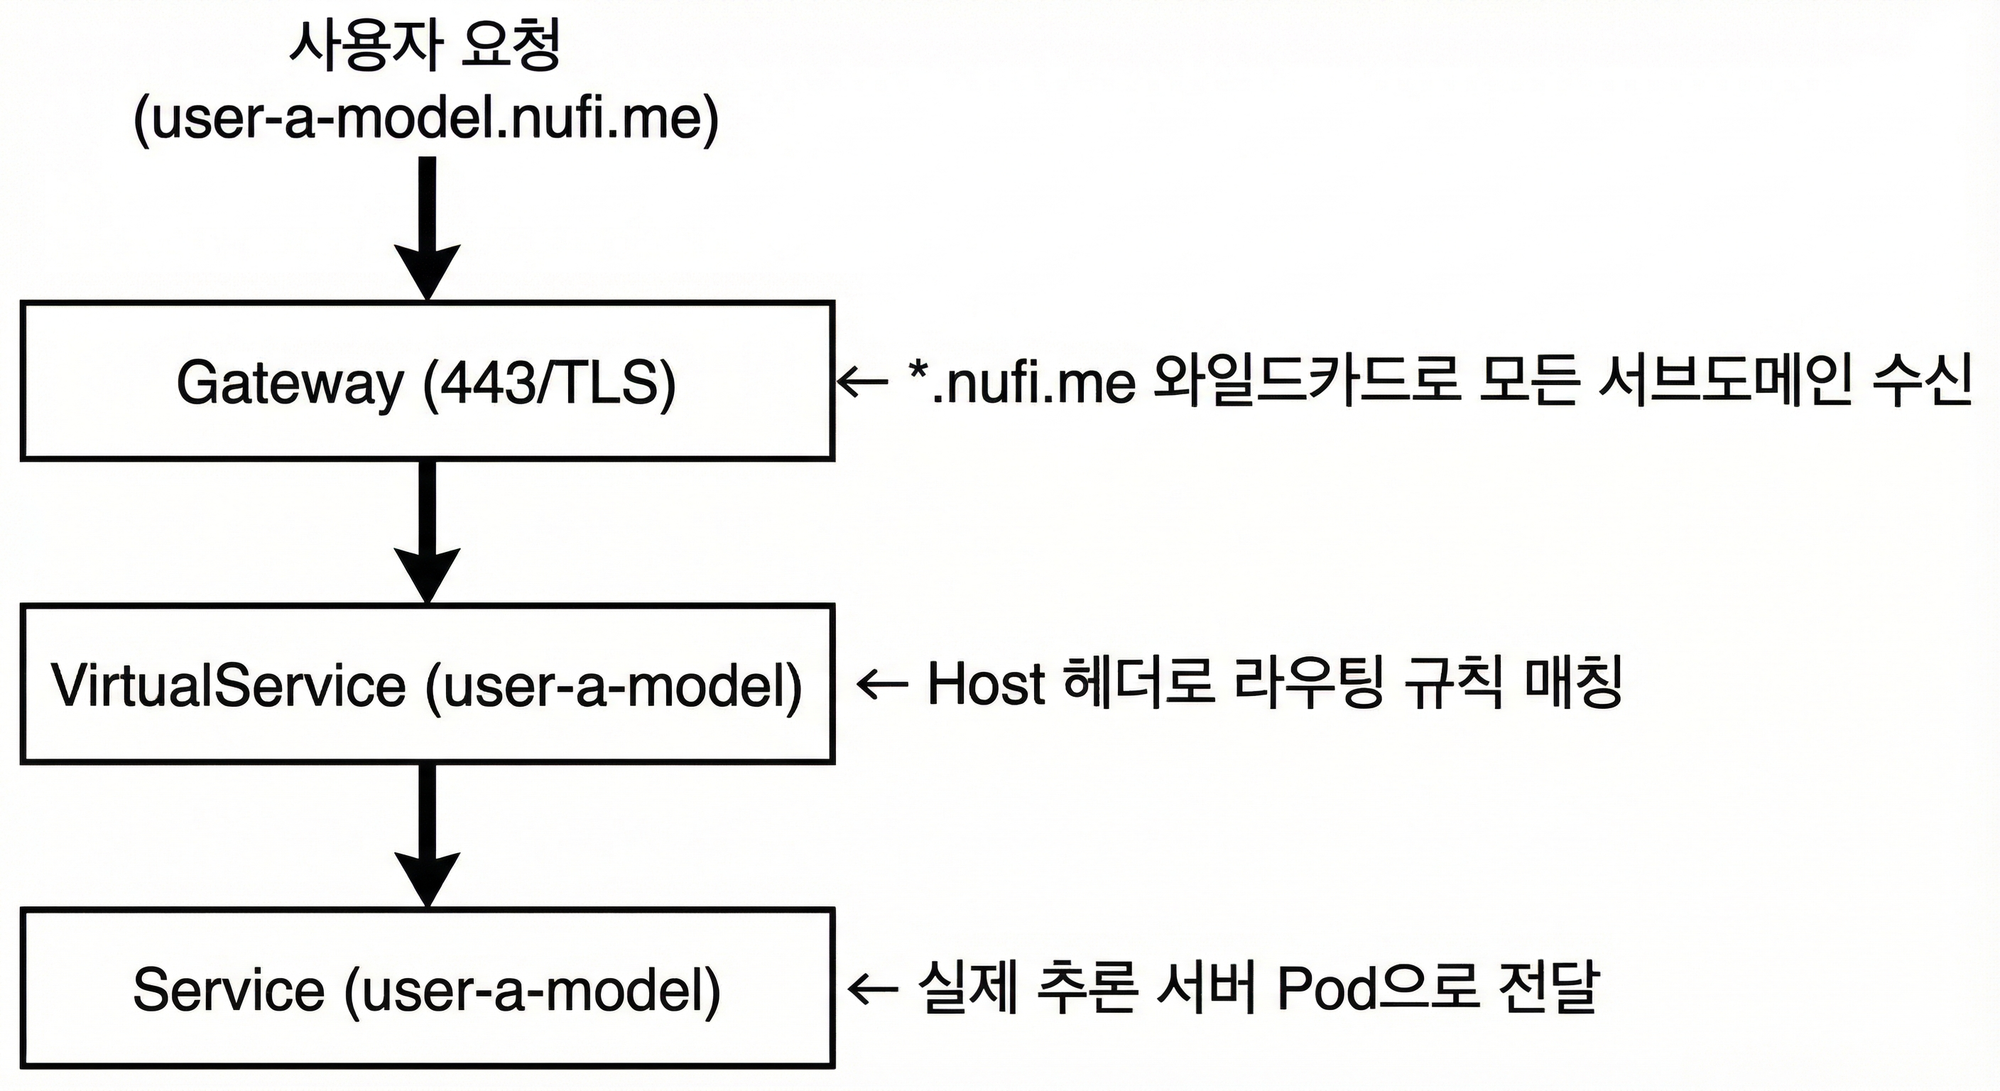
4.2 동적 VirtualService 생성
NpuDeploy Controller가 endpoint.host 필드를 감지하면 자동으로 VirtualService를 생성합니다.
VirtualService 생성 코드(NpuDeploy reconcile) 보기
func (r *NpuDeployReconciler) reconcileVirtualService(
    ctx context.Context,
    npuDeploy *nufiv1.NpuDeploy,
) error {
    vs := &istionetv1beta1.VirtualService{
        ObjectMeta: metav1.ObjectMeta{
            Name:      npuDeploy.Name,
            Namespace: npuDeploy.Namespace,
        },
        Spec: istionetv1beta1api.VirtualService{
            Hosts:    []string{npuDeploy.Spec.Endpoint.Host},
            Gateways: []string{npuDeploy.Spec.Endpoint.Gateway},
            Http: []*istionetv1beta1api.HTTPRoute{{
                Route: []*istionetv1beta1api.HTTPRouteDestination{{
                    Destination: &istionetv1beta1api.Destination{
                        Host: fmt.Sprintf("%s.%s.svc.cluster.local",
                            npuDeploy.Name, npuDeploy.Namespace),
                        Port: &istionetv1beta1api.PortSelector{
                            Number: 80,
                        },
                    },
                }},
            }},
        },
    }

    return r.CreateOrUpdate(ctx, vs)
}
4.3 장점
- Zero Downtime 업데이트: VirtualService 변경은 재시작 없이 즉시 적용
- TLS 자동화: Gateway에서 TLS 종료, 내부는 평문 통신
- 트래픽 분할: Canary 배포, A/B 테스트 등 고급 라우팅 가능
5. vLLM 멀티 GPU/NPU 서빙
5.1 병렬화 전략
대규모 LLM(70B+)은 단일 GPU에 로드할 수 없어 분산 처리가 필수입니다. 주요 병렬화 방식을 검토했습니다.
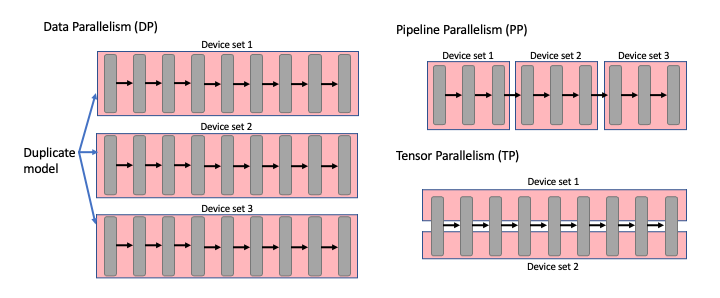
| 방식 | 동작 | 장점 | 단점 |
|---|---|---|---|
| Tensor Parallelism (TP) | 하나의 레이어를 여러 GPU에 분할 | 메모리 효율적, 단일 노드 최적 | GPU 간 통신 오버헤드 |
| Pipeline Parallelism (PP) | 레이어를 그룹으로 나눠 순차 처리 | 멀티 노드 확장 가능 | 파이프라인 버블 발생 |
| Data Parallelism (DP) | 동일 모델 복제본으로 병렬 처리 | 처리량 선형 증가 | 메모리 사용량 증가 |
5.2 Ray기반 멀티 노드 서빙 검증
우리는 KubeRay + vLLM 조합을 통해 멀티 노드 추론 환경을 검증했습니다. Ray 클러스터는 여러 노드의 GPU를 하나의 논리적 자원처럼 묶어주어 Pipeline Parallelism을 가능하게 합니다.
하지만 실제 구축 환경은 고성능 NPU가 다수 장착된 단일 대형 노드 였기에, 오버헤드가 적은 vLLM의 자체 Tensor Parallelism 기능을 메인으로 채택했습니다.
RayService YAML 보기
apiVersion: ray.io/v1
kind: RayService
metadata:
  name: vllm-ray-service
  namespace: llm
spec:
  serveConfigV2: |
    applications:
    - args:
        llm_configs:
          - model_loading_config:
              model_id: meta-llama/Llama-3.1-8B-Instruct
              model_source: meta-llama/Llama-3.1-8B-Instruct
            deployment_config:
              autoscaling_config:
                min_replicas: 1
                max_replicas: 1
            engine_kwargs:
              tensor_parallel_size: 2
              pipeline_parallel_size: 1
              max_model_len: 4096
      import_path: ray.serve.llm:build_openai_app
      name: llm_app
      route_prefix: "/"

  rayClusterConfig:
    rayVersion: '2.48.0'
    headGroupSpec:
      rayStartParams:
        num-cpus: "0"
        num-gpus: "0"
        dashboard-host: '0.0.0.0'
      template:
        spec:
          containers:
            - name: ray-head
              image: rayproject/ray-llm:2.48.0-py311-cu128
              ports:
              - containerPort: 8000
                name: serve
              - containerPort: 8265
                name: dashboard
              resources:
                limits:
                  cpu: "2"
                  memory: "4Gi"
    workerGroupSpecs:
      - groupName: gpu-group
        replicas: 1
        rayStartParams:
          num-gpus: "2"
        template:
          spec:
            containers:
              - name: ray-worker
                image: rayproject/ray-llm:2.48.0-py311-cu128
                resources:
                  limits:
                    cpu: "16"
                    memory: "32Gi"
                    nvidia.com/gpu: "2"
5.3 주의사항
| 항목 | 설명 |
|---|---|
| 공유 메모리 | /dev/shm을 emptyDir: Memory로 마운트 필수 |
| GPU 메모리 | --gpu-memory-utilization으로 OOM 방지 |
| 모델 캐시 | hostPath로 모델 캐시 공유하여 다운로드 시간 절약 |
6. 모니터링 시스템
6.1 메트릭 수집 구조
다양한 하드웨어(GPU, NPU) 모니터링을 위해 Prometheus + Grafana 표준 스택을 활용했습니다. 각 하드웨어 벤더에서 제공하는 Exporter를 통해 메트릭을 수집합니다.
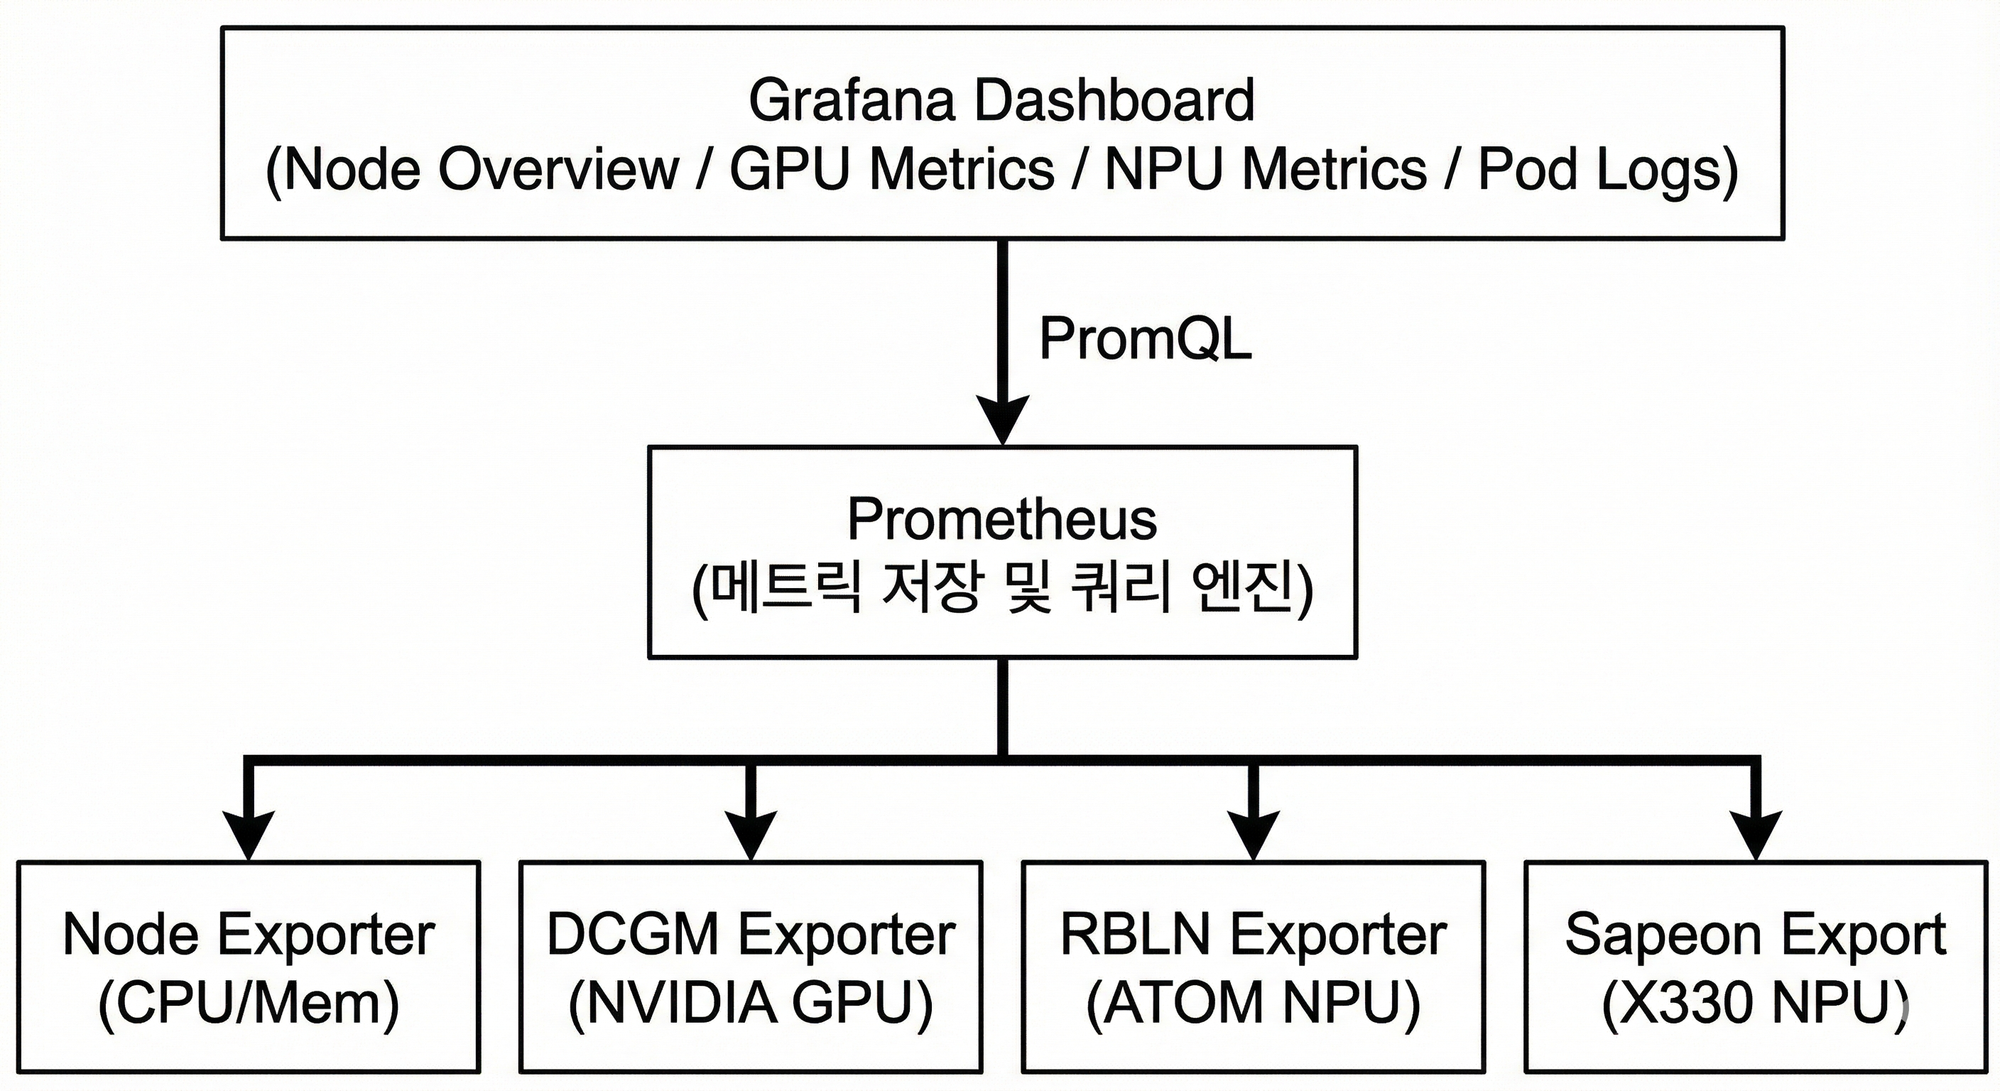
6.2 Exporter 구성
| Exporter | 대상 | 수집 메트릭 |
|---|---|---|
| Node Exporter | CPU, Memory, Disk | 사용률, 온도, I/O |
| DCGM Exporter | NVIDIA GPU | 사용률, 온도, 메모리, 전력 |
| RBLN Exporter | Rebellions ATOM | 사용률, 온도 |
| Sapeon Exporter | Sapeon X330 | 온도(t1, t2), 전력(p1) |
6.3 하드웨어 Fetcher 인터페이스
API 서버에서 다양한 하드웨어 메트릭을 통합 조회하기 위한 인터페이스를 설계했습니다.
HardwareFetcher 인터페이스 코드 보기
type HardwareFetcher interface {
    FetchMetrics(ctx context.Context, promAPI v1.API) (
        map[string]map[string]*HardwareDeviceStatus, error)
}

type HardwareDeviceStatus struct {
    Type        string   // "GPU" 또는 "RBLN"
    DeviceID    string   // 장치 ID
    Utilization *float64 // 사용률 (%)
    Temperature *float64 // 온도 (C)
    MemoryUsed  *float64 // 메모리 사용량 (GB)
    MemoryTotal *float64 // 총 메모리 (GB)
}

// GPU Fetcher 구현
type GPUFetcher struct{}

func (f *GPUFetcher) FetchMetrics(ctx context.Context, promAPI v1.API) (...) {
    utilizationQuery := `DCGM_FI_DEV_GPU_UTIL`
    temperatureQuery := `DCGM_FI_DEV_GPU_TEMP`
    // ... Prometheus 쿼리 수행
}

// RBLN Fetcher 구현
type RBLNFetcher struct{}

func (f *RBLNFetcher) FetchMetrics(ctx context.Context, promAPI v1.API) (...) {
    utilizationQuery := `rbln_device_utilization`
    temperatureQuery := `rbln_device_temperature`
    // ... Prometheus 쿼리 수행
}
이 추상화 덕분에 새로운 하드웨어(예: 새로운 NPU 벤더)를 추가할 때도 Fetcher만 구현하면 됩니다.
7. 마무리
NPU 클러스터에서 LLM 서빙 플랫폼을 구축하면서 배운 점을 정리합니다.
적정 기술 선택의 중요성
KServe를 전체 도입하려다 복잡도가 높아져서, 필요한 패턴만 참고하여 경량화된 CRD를 설계했습니다. Device Plugin도 Rebellions에서 공식 제공하는 것은 그대로 활용하고, 제공되지 않는 X330만 직접 개발했습니다.
환경에 맞는 병렬화 전략
단일 노드에 NPU가 여러 개 있는 환경에서는 Ray 클러스터 없이 vLLM의 --tensor-parallel-size 옵션만으로 충분했습니다. 멀티 노드가 필요한 경우에만 Ray나 Pipeline Parallelism을 고려하면 됩니다.
표준 도구 활용
모니터링은 Prometheus + Grafana 표준 스택에 벤더 제공 Exporter를 연동하는 것으로 충분했습니다. 바퀴를 다시 발명하기보다 검증된 도구를 조합하는 것이 효율적이었습니다.
비슷한 플랫폼을 구축한다면
- 작게 시작하기: KServe 같은 완성된 솔루션을 통째로 도입하기보다, 필요한 기능만 먼저 구현하고 점진적으로 확장하는 것이 유지보수에 유리합니다.
- 벤더 문서 확인: GPU/NPU 벤더들이 Device Plugin, Exporter를 공식 제공하는 경우가 많습니다. 직접 개발하기 전에 먼저 확인해보세요.
- Kubebuilder 활용: Custom Resource가 필요하다면 Kubebuilder로 시작하는 것을 추천합니다. 보일러플레이트 코드 생성과 베스트 프랙티스가 잘 정리되어 있습니다.
References
- Kubernetes Device Plugin Framework
- Rebellions RBLN Device Plugin
- Kubebuilder Book
- KServe Documentation
- vLLM Documentation
- Ray on Kubernetes
- Istio Service Mesh
- Prometheus Monitoring
한국 서버 개발자